BMW i-ABS III bypass surgery
Initially I opted for the bypass from Motorworks UK.


Plan B: order the emulator kit from Serwis ABS in Poland (see my previous blog). Sure, it costs more. But all the original brake lines can remain where they are. And that's giving me peace of mind, which is worth the extra Euro's. And as a bonus, I get the ABS computer modified to suppress the ABS error condition on the dashboard.
Removal of the old ABS unit is pretty straightforward, although it's a bit fiddly to access the screws of the mounting bracket. But I got it done. If you plan to do this follow these steps:
- Remove the fairing and the fuel tank
- Remove the air intake manifold (the 'trunk' on the right side): pull the top and bottom latches out by approx. 1 cm, yank the manifold out of the rubber clamp and gently slide it towards you.
- Unlock the latch and disconnect the big electrical connector from the ABS.
- Disconnect the 2 level sensor connectors on the opposite side of the ABS.
- Remove all the brake fluid from the container for the front brake. This will reduce the amount of fluid leaking from the brake line which goes into the ABS unit.
- Disconnect the vent hose from the ABS unit (you can dispose of it, it's not needed anymore).
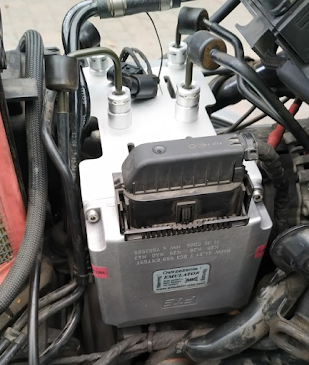
- Remove the vent covers (#2 on the image) and remove as much brake fluid as you can from the ABS unit itself. I used a syringe for that.
- Use a T30 Torx bit to remove the screws which fix the mounting bracket to the bike: 2 on the left side and 1 on the right side. Especially one of both screws on the left side is difficult to access.

- Now the messy part starts: pull up the rubber covers on the quick-release connections and pull out the clips (don't worry about loosing them, the Emulator comes with new clips). Use a screwdriver to pull the clips out.

- Pull the brake lines upward from the ABS unit. Be careful not to kink the metal lines! The brake line which comes from the front brake handle (the one in the front-left corner) will leak the most brake fluid - that's why I drained that container in the first place. Use a rag to contain the leakage. The other brake lines will drip a bit, but not as much. If any brake fluid drips on the engine or other parts of the bike, clean it up with soap and water asap.
- Now push the brake and fuel lines out of the way and pull the ABS out: lift the right end and pull it out towards the right side.
- Put a small plastic box where the ABS used to be, to catch any brake fluid which might still drip from the brake lines. I used a margarine float for that.
- Use an oil pan or any other container and pour the remaining brake fluid out of the ABS unit by holding it upside down over the container. Collect the old brake fluid for recycling.
The ABS including packing material weights just under 5 kg. I shippped the box to Serwis ABS in Poland. They will give me a 100 € discount on the ABS Emulator in return for donating my old ABS as donor for parts they can use to rebuild other ABS units. I'm not so keen to get mine rebuilt. Apart from the expense (+/- 720 € + shipping costs) I'm mostly concerned about how long (or not) a rebuilt ABS unit will last. The box arrived 3 days later at Serwis ABS. Within the hour of arrival I received an e-mail from the shop confirming that my ABS had arrived and that my discount on the purchase of the emulator is approved.
I'm pretty sure that the ABS Emulator will outlive any rebuilt ABS for a fraction of the cost (about 200 €).
Do I worry about not having ABS anymore? Nope. I have been driving this bike for over 10.000 km with ABS and can't remember that the ABS kicked in once in any situation. And I know it worked, because I tested it a few times on a sandy surface.

The Emulator has arrrived

- there is no ABS alarm on the dashboard (the slow blinking ABS alarm is normal and will extinguish when the system detects that the wheels are spinning).
- the brake light comes on when you operate the front brake lever or rear brake pedal
If that's OK, we can take on the final step: turn the ignition off and bleed the brakes. Don't install the fuel tank yet. While bleeding the brakes, verify that the quick-release connections for the brake lines on the Emulator are not leaking.
While you're at it, clean the brake calipers, check the condition of your brake pads and replace them if necessary.
Final step: put the dust covers back on the quick-release connections.
Done with the brakes? No leaks anywhere? No unexpected alarms?
Now restore the bike's tank and tupperware. Before you do that, check the position of the gas cable sheath (#2 on the RealOEM page - see link below). It could happen dat you inadvertently pulled the cable for the right throttle out of the cable distributor. The consequence is that the right cilinder won't fire when you try to start the engine. Happened to me and it took me most of the day and good advice from an experienced tech (thank you, Danny!) to find out what's wrong.
When the bike is ready to ride, make a short test-drive. Start at slow speed and get a feeling for the brake handle (and the pedal for the rear brake). You may have to adjust your braking habits a bit. There is no servo assistance anymore!
Once you get the hang of it, try again at higher speeds. Don't try to be a hero. You may eventually get to the point where your brakes lock up. And they will. You don't have ABS anymore!
I did a short test drive (about 15 km city traffic) and I'm totally happy with the outcome (except for my stupid mistake with the throttle cable 👽).
Here is some feed-back of one of many riders who got used to ride without ABS:

Comments
Post a Comment